-
Shop
- Advanced Technologies
- AI Skills Mastery 2026 Collection
- Beauty
- Best-Sellers
- Calvin Klein
- Car Accessories
- Car Buying & Ownership
- Dating & Social Confidence
- Dating & Social Skills
- Denim
- 7FOR
- AGOLDE
- Antony Morato
- Armani Exchange
- Boss
- Brunello Cucinelli
- Calvin Klein Jeans
- Costume National
- Desigual
- Diesel
- Dolce & Gabbana
- Dsquared²
- Ermanno Scervino
- Fendi
- Gianni Lupo
- Guess Jeans
- Ichi
- Just Cavalli
- Lee
- Levi's
- Liu Jo
- Morgan De Toi
- Mother Denim
- Only
- Pepe Jeans
- Pinko
- Replay
- Tommy Hilfiger Jeans
- Valentino
- Vero Moda
- Digital Resources
- Education & Learning
- Family & Parenting
- Fashion
- Alexander McQueen
- Bags & Wallets
- Balenciaga
- Belts
- Bottega Veneta
- Brunello Cucinelli
- Burberry
- Chanel
- Chloé
- Dior
- Dolce & Gabbana
- Etro
- Fendi
- Gucci
- Hats & Hair Accessories
- Jacquemus
- Jewelry
- Jil Sander
- Jimmy Choo
- Keychains
- Kiton
- Miu Miu
- Off-White
- Prada
- Rick Owens
- Saint Laurent
- Shoes
- Socks & Tights
- Sunglasses
- The Row
- Tom Ford
- Valentino
- Valentino Garavani
- Versace
- Vivienne Westwood
- Watches
- Fashion & Style
- Fashion Accessories
- Financial Education
- Find Your Path Collection
- Fitness
- Furniture
- Gadgets
- Health & Beauty
- Health & Wellness
- Home & Garden
- Home & Kitchen
- Home Styling & Organization
- Home Supplies
- Kids & Babies
- Kitchen
- Lighting
- Nike
- Online Business
- Online Business for Beginners
- Parenting
- Patio, Lawn & Garden
- Personal Growth
- Pet Care
- Pet Supplies
- Pets
- Smart Life with IA
- Sport & Outdoors
- Super Deals
- Travel
- Wealth
- Wealth Building
- Wellness
- YouTube Shorts Best-Sellers
- Popular
- Best deals
Clean Your Washer Drum With Vinegar: Easy Odor Fix
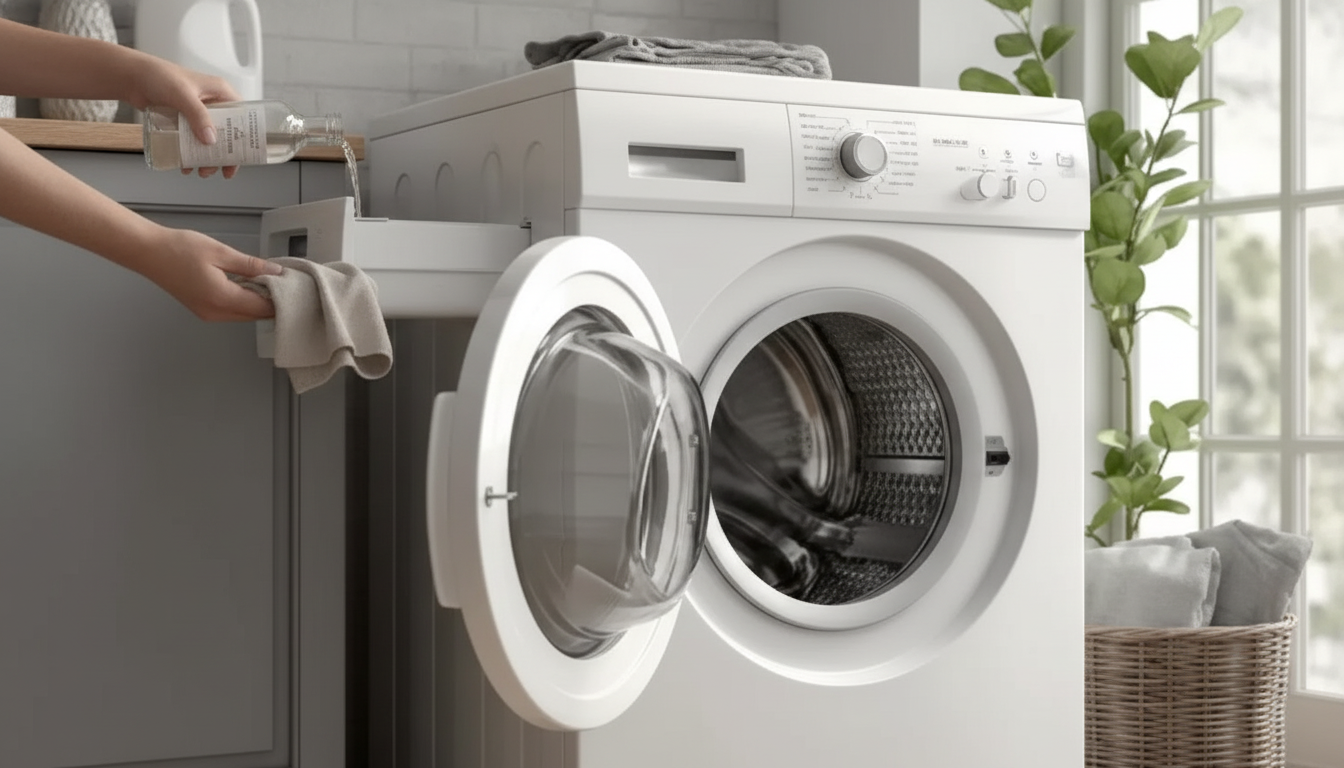
Fresh Start for Your Washer With Vinegar: Drum Cleaning and Simple Maintenance
A washing machine can hold onto detergent residue, hard-water minerals, and moisture that lead to musty odors and dull laundry. A vinegar-based cleaning routine is a straightforward way to freshen the drum and key problem areas, then keep them cleaner with a simple schedule.
Why washing machines start to smell (even when they “look” clean)
Even a shiny-looking drum can hide a thin film of leftover detergent and fabric softener. That sticky layer traps lint and soil, and it can cling to the inner tub, door glass, and dispenser channels where water doesn’t fully rinse.
Moisture plus residue creates a welcoming environment for odor-causing buildup—especially in front-load rubber gaskets, detergent drawers, and any tight crevice that stays damp. If you also have hard water, minerals can deposit over time and reduce cleaning performance, which may show up as dingy whites and less-fresh towels. Finally, frequent cold or low-temperature washes can allow residue to accumulate faster; periodic hot cleaning cycles help “reset” the drum and rinse path.
What vinegar does well—and what it doesn’t
White distilled vinegar is popular because it can loosen some mineral deposits and deodorize by breaking up residue so it rinses away more easily. When paired with a hot cycle, it can help flush leftover detergent film through the drum and drain path.
Vinegar is not a bleach substitute, and it may not fully sanitize or remove every stain or deeply embedded grime on its own. If you’re dealing with persistent slime, mildew, or recurring odors, mechanical cleaning—wiping, brushing, and clearing filters—is often just as important as running a cleaning cycle.
Before starting: quick safety and prep checks
Safety comes first: never mix vinegar with chlorine bleach. Dangerous gas can form, and both the Environmental Protection Agency (EPA) and the CDC warn against mixing household cleaners.
Next, check your washer’s manual for approved cleaning agents and any “Tub Clean/Drum Clean” recommendations. Remove all laundry, clear the drum, and wipe away visible debris. If your machine has a dedicated drum-clean cycle, plan to use it on the hottest setting allowed.
Step-by-step drum cleaning with vinegar (easy reset routine)
Step 1: Set the washer to the hottest, longest cycle available (or select the “Tub Clean/Drum Clean” cycle).
Step 2: Add white distilled vinegar to the correct place. Many washers allow vinegar in the detergent dispenser (main wash), while others work best with vinegar poured directly into the empty drum. Choose the approach that matches your washer design and manual guidance.
Step 3: Start the cycle and let it complete fully so residue flushes through the drum, pump, and drain path.
Step 4: When the cycle ends, wipe the drum, door glass (front-load), and any visible crevices with a microfiber cloth.
Step 5: Run an extra rinse cycle if a strong vinegar scent remains or if heavy residue was present.
Step 6: Leave the door or lid open afterward to help the interior dry—one of the simplest ways to prevent odors from returning.
If you want a printable checklist that keeps the steps consistent (and easy to repeat), the Fresh Start for Your Washer With Vinegar eBook lays out the routine in a straightforward, repeatable order.
Front-load focus: gasket, door, and detergent drawer
Gasket wipe-down: Gently pull back the rubber seal and wipe moisture, lint, and residue from the folds. This is where odors often begin because water can sit unnoticed.
Detergent drawer: Remove the drawer and rinse it under warm water. Use a small brush to scrub corners and channels where gel detergents and softener can congeal.
Top-load focus: agitator/impeller area and rim buildup
Don’t skip these: filter, drain, and the hidden odor culprits
For additional manufacturer-aligned tips on cleaning cycles and common trouble spots, Whirlpool’s overview is a helpful reference: How to Clean a Washing Machine.
Simple maintenance schedule (so the smell doesn’t come back)
Washer Cleaning and Maintenance Rhythm
| Task | How Often | Best For | Quick Notes |
|---|---|---|---|
| Run a hot drum-clean cycle with vinegar | Every 2–4 weeks | Odor prevention, residue control | Use hottest cycle; follow manual guidance |
| Wipe gasket/door (front-load) or rim (top-load) | Weekly | Preventing musty smells | Focus on moisture lines and folds |
| Clean detergent drawer | Monthly | Reducing slime and clogs | Rinse, brush corners, air-dry |
| Clean pump filter (if present) | Every 1–3 months | Drain performance, odor control | Place towel/pan; check for debris |
| Leave door/lid open to dry | After every load | All washers | Improves airflow; reduces moisture |
Troubleshooting: when odors or residue persist
A guided approach for consistent results
For a ready-to-follow routine you can repeat every few weeks, keep the Fresh Start for Your Washer With Vinegar eBook handy as a quick reference. If you’re building a small library of practical care checklists for daily life, the Your Go-To Ingredients for Dry, Damaged Hair digital checklist is another easy-to-save guide for routine maintenance—this time for personal care instead of appliances.
FAQ
How much vinegar should be used to clean a washing machine drum?
A practical range is about 1–2 cups of white distilled vinegar for a hot drum-clean cycle, depending on washer size and what your manual allows. If the scent lingers or the washer had heavy buildup, run an extra rinse afterward.
Is vinegar safe for front-load washer rubber gaskets?
Occasional use is commonly tolerated, but it’s best not to leave vinegar sitting on rubber for long periods. Wipe the gasket after the cycle, rinse/wipe with water if needed, and follow your manufacturer’s guidance.
What should never be mixed with vinegar when cleaning a washer?
Never mix vinegar with chlorine bleach, since dangerous fumes can form. If you use different cleaners at different times, rinse thoroughly between products to avoid unintended chemical reactions.















Leave a comment