-
Shop
- Advanced Technologies
- AI Skills Mastery 2026 Collection
- Beauty
- Best-Sellers
- Calvin Klein
- Car Accessories
- Car Buying & Ownership
- Dating & Social Confidence
- Dating & Social Skills
- Denim
- 7FOR
- AGOLDE
- Antony Morato
- Armani Exchange
- Boss
- Brunello Cucinelli
- Calvin Klein Jeans
- Costume National
- Desigual
- Diesel
- Dolce & Gabbana
- Dsquared²
- Ermanno Scervino
- Fendi
- Gianni Lupo
- Guess Jeans
- Ichi
- Just Cavalli
- Lee
- Levi's
- Liu Jo
- Morgan De Toi
- Mother Denim
- Only
- Pepe Jeans
- Pinko
- Replay
- Tommy Hilfiger Jeans
- Valentino
- Vero Moda
- Digital Resources
- Education & Learning
- Family & Parenting
- Fashion
- Alexander McQueen
- Bags & Wallets
- Balenciaga
- Belts
- Bottega Veneta
- Brunello Cucinelli
- Burberry
- Chanel
- Chloé
- Dior
- Dolce & Gabbana
- Etro
- Fendi
- Gucci
- Hats & Hair Accessories
- Jacquemus
- Jewelry
- Jil Sander
- Jimmy Choo
- Keychains
- Kiton
- Miu Miu
- Off-White
- Prada
- Rick Owens
- Saint Laurent
- Shoes
- Socks & Tights
- Sunglasses
- The Row
- Tom Ford
- Valentino
- Valentino Garavani
- Versace
- Vivienne Westwood
- Watches
- Fashion & Style
- Fashion Accessories
- Financial Education
- Find Your Path Collection
- Fitness
- Furniture
- Gadgets
- Health & Beauty
- Health & Wellness
- Home & Garden
- Home & Kitchen
- Home Styling & Organization
- Home Supplies
- Kids & Babies
- Kitchen
- Lighting
- Nike
- Online Business
- Online Business for Beginners
- Parenting
- Patio, Lawn & Garden
- Personal Growth
- Pet Care
- Pet Supplies
- Pets
- Smart Life with IA
- Sport & Outdoors
- Super Deals
- Travel
- Wealth
- Wealth Building
- Wellness
- YouTube Shorts Best-Sellers
- Popular
- Best deals
60PCS Luminous Cream Heart Nail Charms (3D Peach)
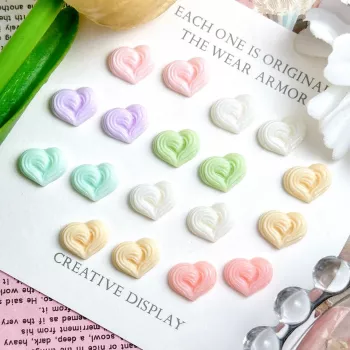
60PCS Luminous Cream Heart Nail Charms – 3D Peach Resin Nail Decorations
Add a soft, candy-toned glow to manicures with 3D peach resin heart charms in a creamy luminous finish. This 60-piece set is made for quick, high-impact accents on gel, acrylic, press-ons, or natural nails—perfect for sweet, playful looks that still feel polished. The hearts give instant dimension without needing advanced hand-painting skills, and the lightweight resin construction helps keep sets comfortable for everyday wear.
What Makes These Heart Charms Stand Out
- Instant 3D dimension: Peach-resin hearts create depth and a focal point with minimal effort.
- Luminous “cream” effect: A gentle glow-like finish that reads cute in daylight and more eye-catching in low light.
- 60-piece value: Enough for multiple manicures, mix-and-match placement, and test runs while refining designs.
- Flexible compatibility: Works with gel, acrylic, dip overlays, and press-ons when paired with the right adhesive.
At-a-Glance Details
These charms are designed for accent placement—feature nails, a cuticle highlight, or clustered “kawaii” layouts. Since they’re lightweight resin rather than heavy metal, they’re less likely to feel bulky or snaggy when properly anchored. They look especially smooth against pastel bases, sheer milky gels, and glossy top coats that amplify the creamy glow.
Quick Specs
| Feature | What to Expect | Why It Matters |
|---|---|---|
| Quantity | 60 pieces | Enough for multiple manicures and design testing |
| Style | Cream heart, 3D peach resin | Soft, playful look with noticeable dimension |
| Finish | Luminous effect | Adds a glow-like accent for evening or low-light looks |
| Best use | Accent charm / nail decoration | Creates focal points without hand-painting |
| Compatibility | Gel, acrylic, press-ons (with suitable adhesive) | Flexible for home or salon routines |
How to Apply 3D Resin Nail Charms (Gel Method)
If long wear is the goal, a gel-based method (builder gel, rhinestone gel, or thick top gel) typically provides the most secure hold and the cleanest finish around the charm’s base.
- Prep: Cleanse nails, lightly buff, remove dust, apply base coat, and cure based on your gel system directions.
- Lay color: Apply your chosen gel color and cure fully so the charm won’t shift or sink into soft layers.
- Placement gel: Add a small bead of builder gel, rhinestone gel, or thick top gel where the charm will sit.
- Set the charm: Use tweezers to place the heart; gently press so the gel supports the edges without flooding the 3D details.
- Cure: Fully cure to lock the charm in place.
- Seal strategically: Apply top coat around the base/edges to reduce lifting. Avoid burying the charm if you want crisp 3D definition.
Alternative Application Options (Acrylic, Press-Ons, Natural Nails)
- Acrylic: Place charms into slightly tacky acrylic before it fully sets, then add a glossy seal around the base to smooth the transition.
- Press-ons: Attach charms before wearing (best) using thick gel glue or resin-safe nail glue; cure if using a gel adhesive so the base fully hardens.
- Natural nails (regular polish): Use a strong charm glue, then top coat around edges. Expect shorter durability than gel systems, especially with frequent handwashing.
- Longevity tip: Keep charms away from free-edge corners if nails are used heavily for daily tasks—corners are where snags and early lifting start most often.
Design Ideas for a Creamy Luminous Heart Look
- Milky jelly base + single heart accent: One heart on each ring finger creates a clean, sweet finish without looking busy.
- French tips + heart at the cuticle line: A balanced, salon-style layout that keeps the 3D detail away from the free edge.
- Pastel ombré + scattered hearts: Use 1–2 hearts per nail for a soft “confetti” effect that still feels cohesive.
- Chrome/glazed base + contrast sealing: Keep the base glossy and emphasize the heart edges with careful top-coat placement for a crisp silhouette.
- Clustered accent moment: Pair one heart with tiny pearls or micro rhinestones for layered 3D texture without overpowering the set.
Care, Wear Time, and Removal
- Wear time depends on adhesive: Builder gel or rhinestone gel generally lasts longer than basic top coat or standard glue alone.
- Avoid picking at edges: Lifting often begins when hair or fabric catches a slightly raised base.
- Use gloves for chores: Cleaning and dishwashing can stress adhesives; gloves help protect both nails and skin.
- Removal (gel/acrylic): Methods vary by system. When soaking off is appropriate, carefully reduce bulk (file the top layer) before acetone soak to speed up breakdown.
- If a charm loosens: Remove it cleanly, re-prep the spot, and reattach. Sealing over a lifted edge usually makes snagging worse.
Safety and Comfort Notes
- Keep away from eyes and mouth; small parts are not suitable for children.
- When using nail glue or gel adhesives, follow the product directions and avoid skin contact to reduce irritation risk.
- For sensitive skin, consider patch-testing adhesive products and choosing low-odor, cosmetic-grade options.
- Store charms closed and away from heat/direct sunlight to help maintain the finish and reduce discoloration.
For broader cosmetic safety and ingredient oversight information, reference the U.S. Food & Drug Administration (FDA) – Cosmetics. For everyday nail health habits, the American Academy of Dermatology Association – Nail care basics is a helpful guide.
Shop In-Stock Favorites
- 60PCS Luminous Cream Heart Nail Charms – 3D Peach Resin Nail Decorations (USD 2.01)
- Mini USB Aroma Humidifier & Essential Oil Diffuser with Soft LED Light (USD 5.01)
- 18K Rose Gold Moissanite Ring 0.3ct Square Diamond (USD 84.51)
FAQ
What does luminous cream do?
It creates a soft glow-like finish that can look brighter in low light, adding a gentle highlighted effect rather than a harsh neon look.


Leave a comment